Open-source RightAI Tools Directory
  • Discover AI
  • Submit
  • Startup
  • Blog
Open-source RightAI Tools Directory
Discover the best AI tools of 2025 with the RightAI Tools Directory!

Friend Links

AI Anime GeneratorToolsApp AI

Support

Tap4
Privacy policyTerms & ConditionsContact Us
Loading...
loading...

Vocha | Voice for ChatGPT

ChatGPT Voice
Visit Website
Vocha | Voice for ChatGPT
Visit Website

Introduction

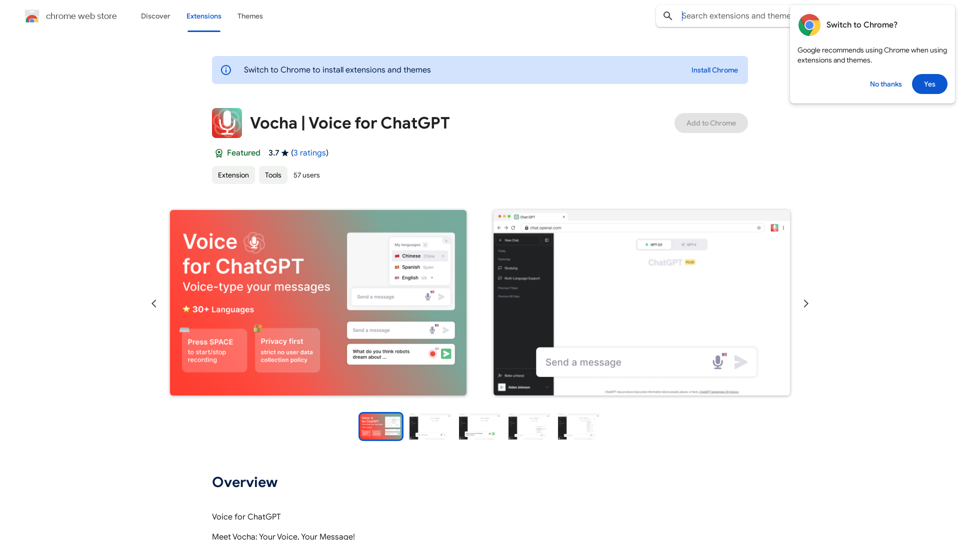
Vocha is a Chrome extension designed to enhance the ChatGPT experience by enabling voice-typing functionality. It introduces a microphone button to the message field, allowing users to dictate their messages using voice commands. This tool is particularly useful for those who prefer speaking over typing or need to communicate in multiple languages.

Feature

Easy Voice-Typing Integration

Vocha seamlessly integrates with ChatGPT, adding a microphone button to the message field. Users can activate this feature using the SPACE shortcut or by clicking the button, making voice-typing quick and convenient.

Multilingual Support

The extension supports over 30 languages, catering to a global user base. Users can easily switch between languages, making it an ideal tool for multilingual communication.

Flexible Message Handling

After recording a message, users have the option to send it immediately, edit it before sending, or continue recording. This flexibility ensures that users have full control over their voice-typed messages.

Simple Installation and Setup

Installing Vocha is straightforward:

  1. Install the extension from the Chrome Web Store
  2. Reload the webpage to activate the extension
  3. Grant microphone access when prompted

User-Friendly Interface

The extension adds a microphone button and a language selection flag to the ChatGPT interface, making it easy to access and use the voice-typing feature.

FAQ

How do I activate voice-typing with Vocha?

To start voice-typing, you can either:

  • Press the SPACE key shortcut
  • Click the microphone button in the message field

Does Vocha support multiple languages?

Yes, Vocha supports over 30 languages. You can change the language by clicking the flag icon near the microphone button and selecting your preferred language.

Is my privacy protected when using Vocha?

Vocha prioritizes user privacy and does not collect or use your data for training purposes or any other means.

What should I do if Vocha isn't working after installation?

If you experience issues after installing Vocha, try the following:

  1. Reload or refresh the webpage to ensure the extension is properly activated
  2. Make sure you've granted microphone access when prompted

Can I edit my voice-typed message before sending?

Yes, after recording your message, you have the option to edit it before sending. You can also choose to send it immediately or continue recording.

Related Websites

Get ChatGPT for Free with Google

You can now access ChatGPT, a powerful language model, for free with Google. Here's how:

Method 1: Google Colab

* Open Google Colab ([colab.research.google.com](http://colab.research.google.com))
* Create a new notebook
* Install the `transformers` library by running `!pip install transformers`
* Import the `transformers` library and load the ChatGPT model using `from transformers import AutoModelForCausalLM, AutoTokenizer; model = AutoModelForCausalLM.from_pretrained('chatgpt'); tokenizer = AutoTokenizer.from_pretrained('chatgpt')`
* Use the model to generate text using `input_text = "Your input here"; inputs = tokenizer.encode_plus(input_text, return_tensors='pt', max_length=1024, padding='max_length', truncation=True); output = model(inputs['input_ids'], attention_mask=inputs['attention_mask']); print(tokenizer.decode(output.logits[0], skip_special_tokens=True))`

Method 2: Google Apps Script

* Open Google Apps Script ([script.google.com](http://script.google.com))
* Create a new project
* Install the `transformers` library by running `npm install transformers`
* Import the `transformers` library and load the ChatGPT model using `const { AutoModelForCausalLM, AutoTokenizer } = require('transformers'); const model = new AutoModelForCausalLM('chatgpt'); const tokenizer = new AutoTokenizer('chatgpt');`
* Use the model to generate text using `const inputText = "Your input here"; const inputs = tokenizer.encodePlus(inputText, { return_tensors: 'pt', max_length: 1024, padding: 'max_length', truncation: true }); const output = model(inputs.inputIds, inputs.attentionMask); console.log(tokenizer.decode(output.logits[0], { skipSpecialTokens: true }));`

Note: These methods require some technical knowledge and may have limitations compared to the original ChatGPT model.
View Detail

Get ChatGPT for Free with Google You can now access ChatGPT, a powerful language model, for free with Google. Here's how: Method 1: Google Colab * Open Google Colab ([colab.research.google.com](http://colab.research.google.com)) * Create a new notebook * Install the `transformers` library by running `!pip install transformers` * Import the `transformers` library and load the ChatGPT model using `from transformers import AutoModelForCausalLM, AutoTokenizer; model = AutoModelForCausalLM.from_pretrained('chatgpt'); tokenizer = AutoTokenizer.from_pretrained('chatgpt')` * Use the model to generate text using `input_text = "Your input here"; inputs = tokenizer.encode_plus(input_text, return_tensors='pt', max_length=1024, padding='max_length', truncation=True); output = model(inputs['input_ids'], attention_mask=inputs['attention_mask']); print(tokenizer.decode(output.logits[0], skip_special_tokens=True))` Method 2: Google Apps Script * Open Google Apps Script ([script.google.com](http://script.google.com)) * Create a new project * Install the `transformers` library by running `npm install transformers` * Import the `transformers` library and load the ChatGPT model using `const { AutoModelForCausalLM, AutoTokenizer } = require('transformers'); const model = new AutoModelForCausalLM('chatgpt'); const tokenizer = new AutoTokenizer('chatgpt');` * Use the model to generate text using `const inputText = "Your input here"; const inputs = tokenizer.encodePlus(inputText, { return_tensors: 'pt', max_length: 1024, padding: 'max_length', truncation: true }); const output = model(inputs.inputIds, inputs.attentionMask); console.log(tokenizer.decode(output.logits[0], { skipSpecialTokens: true }));` Note: These methods require some technical knowledge and may have limitations compared to the original ChatGPT model.

Get ChatGPT for Free with Google You can now access ChatGPT, a powerful language model, for free with Google. Here's how: Method 1: Google Colab * Open Google Colab ([colab.research.google.com](http://colab.research.google.com)) * Create a new notebook * Install the `transformers` library by running `!pip install transformers` * Import the `transformers` library and load the ChatGPT model using `from transformers import AutoModelForCausalLM, AutoTokenizer; model = AutoModelForCausalLM.from_pretrained('chatgpt'); tokenizer = AutoTokenizer.from_pretrained('chatgpt')` * Use the model to generate text using `input_text = "Your input here"; inputs = tokenizer.encode_plus(input_text, return_tensors='pt', max_length=1024, padding='max_length', truncation=True); output = model(inputs['input_ids'], attention_mask=inputs['attention_mask']); print(tokenizer.decode(output.logits[0], skip_special_tokens=True))` Method 2: Google Apps Script * Open Google Apps Script ([script.google.com](http://script.google.com)) * Create a new project * Install the `transformers` library by running `npm install transformers` * Import the `transformers` library and load the ChatGPT model using `const { AutoModelForCausalLM, AutoTokenizer } = require('transformers'); const model = new AutoModelForCausalLM('chatgpt'); const tokenizer = new AutoTokenizer('chatgpt');` * Use the model to generate text using `const inputText = "Your input here"; const inputs = tokenizer.encodePlus(inputText, { return_tensors: 'pt', max_length: 1024, padding: 'max_length', truncation: true }); const output = model(inputs.inputIds, inputs.attentionMask); console.log(tokenizer.decode(output.logits[0], { skipSpecialTokens: true }));` Note: These methods require some technical knowledge and may have limitations compared to the original ChatGPT model.

How to Add ChatGPT to All Google Searches ===================================================== Step 1: Create a Custom Search Engine -------------------------------------- * Go to the [Google Custom Search Engine](https://cse.google.com/) website and sign in with your Google account. * Click on the "New Search Engine" button. * Fill in the required information, such as the name and description of your search engine. * Click on the "Create" button. Step 2: Add ChatGPT to the Search Engine ----------------------------------------- * In the "Setup" tab, click on the "Add" button next to "Sites to search". * Enter the following URL: `https://chat.openai.com/` * Click on the "Add" button. Step 3: Configure the Search Engine -------------------------------------- * In the "Setup" tab, click on the "Edit" button next to "Search engine keywords". * Add the following keywords: `ChatGPT` * Click on the "Save" button. Step 4: Get the Search Engine Code ------------------------------------- * In the "Setup" tab, click on the "Get code" button. * Copy the HTML code provided. Step 5: Add the Search Engine to Your Browser ------------------------------------------------ * Open your browser and go to the "Settings" or "Options" page. * Look for the "Search engine" or "Default search engine" option. * Click on the "Add" or "Manage search engines" button. * Paste the HTML code you copied earlier. * Click on the "Add" or "Save" button. You're Done! =============== Now, whenever you search on Google, ChatGPT will be included in the search results. You can also use the custom search engine URL provided by Google to search directly.

193.90 M
Minimize Climate Risk | Maximize Future Opportunities | ClimateAi
View Detail

Minimize Climate Risk | Maximize Future Opportunities | ClimateAi

Minimize Climate Risk | Maximize Future Opportunities | ClimateAi

Build climate resilience with accurate insights and actionable recommendations that will give you a competitive edge.

10.69 K
CurseCut - Automatic AI Profanity Removal for Video and Audio
View Detail

CurseCut - Automatic AI Profanity Removal for Video and Audio

CurseCut - Automatic AI Profanity Removal for Video and Audio

Effortlessly remove profanity from your video audio using our advanced AI technology. Try CurseCut today for clean, professional content.

28.22 K
Artu
View Detail

Artu

Artu

ARTU Meetings: Your Meeting's Personal Scribe! Install ARTU to receive automatic meeting minutes for your Google Meet and...

193.90 M
Omost | Try Omost for Free Online - AI-Powered Image Generation from Code
View Detail

Omost | Try Omost for Free Online - AI-Powered Image Generation from Code

Omost | Try Omost for Free Online - AI-Powered Image Generation from Code

Omost offers large language model (LLM) models that can generate code to create visual images using Omost's virtual Canvas agent.

0
AI Detector for Text and Images - Winston AI
View Detail

AI Detector for Text and Images - Winston AI

AI Detector for Text and Images - Winston AI

Winston AI is the most trusted AI detector to help identify AI-generated content and AI images.

193.90 M
Fast ChatGPT
View Detail

Fast ChatGPT

Fast ChatGPT

Using ChatGPT in a browser popup window without having to switch tabs.

193.90 M
Castofly
View Detail

Castofly

Castofly

Castofly Chrome Extension

193.90 M