Open-source RightAI Tools Directory
  • Discover AI
  • Submit
  • Startup
  • Blog
Open-source RightAI Tools Directory
Discover the best AI tools of 2025 with the RightAI Tools Directory!

Friend Links

AI Anime GeneratorToolsApp AI

Support

Tap4
Privacy policyTerms & ConditionsContact Us
Loading...
loading...

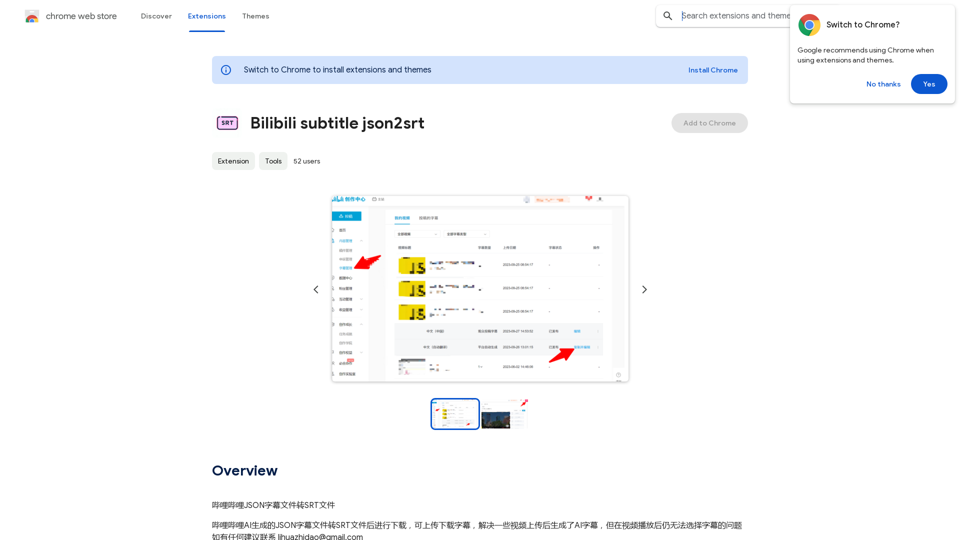
Convert Bilibili subtitle JSON to SRT format.

Bilibili JSON Subtitle File to SRT File Converter
Visit Website
Convert Bilibili subtitle JSON to SRT format.
Visit Website

Introduction

Bilibili Subtitle Json2srt is a browser extension designed to convert Bilibili's JSON subtitle files into SRT format. This tool enables users to download and utilize subtitles for offline video playback, making it particularly beneficial for those who wish to watch Bilibili content without an internet connection. The extension supports multiple languages and offers a user-friendly interface for easy subtitle conversion and download.

Feature

JSON to SRT Conversion

Bilibili Subtitle Json2srt efficiently converts Bilibili's JSON subtitle files into the widely-used SRT format, ensuring compatibility with various media players and subtitle editors.

Offline Subtitle Access

Users can download converted subtitles, allowing for offline video playback with accurate timing and text synchronization.

Multi-Language Support

The extension accommodates multiple languages, catering to a diverse user base and enhancing accessibility for international viewers.

User-Friendly Interface

With a simple installation process and intuitive usage, Bilibili Subtitle Json2srt offers a seamless experience for users of all technical levels.

Free of Charge

Bilibili Subtitle Json2srt is available as a free extension, allowing users to access its features without any cost.

Batch Processing

The extension supports downloading subtitles for multiple videos simultaneously, improving efficiency for users working with numerous files.

FAQ

How do I use Bilibili Subtitle Json2srt?

To use the extension:

  1. Install it in your browser
  2. Open the desired Bilibili video
  3. Click the extension icon
  4. Select your preferred language
  5. Click "Download" to save the SRT file
  6. Open the SRT file with a text editor or compatible video player

Can I download subtitles for non-Bilibili videos?

No, the extension is specifically designed for videos available on Bilibili's platform.

Does it support all languages?

The extension supports languages that are available for the specific video on Bilibili. It cannot generate subtitles in languages not provided by the original content.

Can I convert subtitles to formats other than SRT?

Currently, the extension only supports conversion to SRT format, which is widely compatible with various media players and subtitle editors.

Related Websites

Image Enhancer
View Detail

Image Enhancer

Image Enhancer

Enhance photos effortlessly with AI photo enhancer. Increase image resolution, improve colors, and make photo clear with just a click!

290.25 M
Raw Photo Editor | Buy Raw Photo Editing Software Online - ON1
View Detail

Raw Photo Editor | Buy Raw Photo Editing Software Online - ON1

Raw Photo Editor | Buy Raw Photo Editing Software Online - ON1

Unlock your creativity with the ultimate raw photo editing software. ON1 Photo RAW makes raw photo editing effortless with the help of AI. Edit, organize, and process your photos while maintaining the highest image quality. Purchase or subscribe to Photo RAW raw editing software from ON1 now!

414.08 K
Taobao Image Search
View Detail

Taobao Image Search

Taobao Image Search

Market Price, Taobao Image Search, Lowest Price, Purchasing Agent

290.25 M
ChatGPT-Powered Google Search
View Detail

ChatGPT-Powered Google Search

ChatGPT-Powered Google Search

Improve your Google searches with ChatGPT. Receive AI-powered insights along with your search results.

290.25 M
FluxAI Pro - Advanced Flux Image Generator
View Detail

FluxAI Pro - Advanced Flux Image Generator

FluxAI Pro - Advanced Flux Image Generator

FluxAI Pro: Superior Flux Image Generator with exceptional text rendering. Powered by FLUX.1 Pro, Dev, Schnell and Realism models.

181.21 K
AI Video Editor - Text to Video By Viggle
View Detail

AI Video Editor - Text to Video By Viggle

AI Video Editor - Text to Video By Viggle

Generate videos from text prompts with our Text-to-Video tool based on OpenAI Viggle.

290.25 M
Dating Photo AI
View Detail

Dating Photo AI

Dating Photo AI

Meet Dating Photo AI - the only tool that helps you increase your dating profile matches by making you look like the best version of yourself. By applying the latest AI techniques, we make you get the matches that you deserve.

0
Batch Save ChatGPT to Notion

This is a guide on how to save multiple ChatGPT responses to Notion in a batch. 

Tools You'll Need:

* ChatGPT: An AI chatbot that can generate text.
* Notion: A note-taking and project management tool.
* Python: A programming language.
* Requests Library: A Python library for making HTTP requests.

Steps:

1. Get Your Notion API Token:
   - Go to your Notion workspace settings.
   - Navigate to the "Integrations" tab.
   - Click "Create new integration" and choose "API Token".
   - Copy your API token.

2. Install Python Libraries:
   - Open your terminal or command prompt.
   - Type `pip install requests` and press Enter.

3. Write Python Script:
   - Create a new Python file (e.g., `save_chatgpt_to_notion.py`).
   - Paste the following code into the file, replacing `YOUR_NOTION_API_TOKEN` with your actual token:

```python
import requests

def save_chatgpt_response_to_notion(response, page_id, token):
  """Saves a ChatGPT response to a Notion page."""
  url = f"https://api.notion.com/v1/pages/{page_id}/children"
  headers = {"Authorization": f"Bearer {token}"}
  data = {
    "parent": {
      "page_id": page_id
    },
    "properties": {
      "title": {
        "title": [
          {
            "text": {
              "content": "ChatGPT Response"
            }
          }
        ]
      },
      "content": {
        "rich_text": [
          {
            "text": {
              "content": response
            }
          }
        ]
      }
    }
  }
  response = requests.post(url, headers=headers, json=data)
  print(response.status_code)

Example usage
page_id = "YOUR_NOTION_PAGE_ID"
token = "YOUR_NOTION_API_TOKEN"

Get ChatGPT responses (replace with your actual ChatGPT interaction)
chatgpt_responses = [
  "This is the first ChatGPT response.",
  "This is the second ChatGPT response.",
  "This is the third ChatGPT response."
]

Save each response to Notion
for response in chatgpt_responses:
  save_chatgpt_response_to_notion(response, page_id, token)
```

4. Run the Script:
   - In your terminal, navigate to the directory where you saved the Python file.
   - Type `python save_chatgpt_to_notion.py` and press Enter.

5. Check Notion:
   - Open your Notion workspace and go to the page specified by `page_id`.
   - You should see your ChatGPT responses saved as separate blocks.
View Detail

Batch Save ChatGPT to Notion This is a guide on how to save multiple ChatGPT responses to Notion in a batch. Tools You'll Need: * ChatGPT: An AI chatbot that can generate text. * Notion: A note-taking and project management tool. * Python: A programming language. * Requests Library: A Python library for making HTTP requests. Steps: 1. Get Your Notion API Token: - Go to your Notion workspace settings. - Navigate to the "Integrations" tab. - Click "Create new integration" and choose "API Token". - Copy your API token. 2. Install Python Libraries: - Open your terminal or command prompt. - Type `pip install requests` and press Enter. 3. Write Python Script: - Create a new Python file (e.g., `save_chatgpt_to_notion.py`). - Paste the following code into the file, replacing `YOUR_NOTION_API_TOKEN` with your actual token: ```python import requests def save_chatgpt_response_to_notion(response, page_id, token): """Saves a ChatGPT response to a Notion page.""" url = f"https://api.notion.com/v1/pages/{page_id}/children" headers = {"Authorization": f"Bearer {token}"} data = { "parent": { "page_id": page_id }, "properties": { "title": { "title": [ { "text": { "content": "ChatGPT Response" } } ] }, "content": { "rich_text": [ { "text": { "content": response } } ] } } } response = requests.post(url, headers=headers, json=data) print(response.status_code) Example usage page_id = "YOUR_NOTION_PAGE_ID" token = "YOUR_NOTION_API_TOKEN" Get ChatGPT responses (replace with your actual ChatGPT interaction) chatgpt_responses = [ "This is the first ChatGPT response.", "This is the second ChatGPT response.", "This is the third ChatGPT response." ] Save each response to Notion for response in chatgpt_responses: save_chatgpt_response_to_notion(response, page_id, token) ``` 4. Run the Script: - In your terminal, navigate to the directory where you saved the Python file. - Type `python save_chatgpt_to_notion.py` and press Enter. 5. Check Notion: - Open your Notion workspace and go to the page specified by `page_id`. - You should see your ChatGPT responses saved as separate blocks.

Batch Save ChatGPT to Notion This is a guide on how to save multiple ChatGPT responses to Notion in a batch. Tools You'll Need: * ChatGPT: An AI chatbot that can generate text. * Notion: A note-taking and project management tool. * Python: A programming language. * Requests Library: A Python library for making HTTP requests. Steps: 1. Get Your Notion API Token: - Go to your Notion workspace settings. - Navigate to the "Integrations" tab. - Click "Create new integration" and choose "API Token". - Copy your API token. 2. Install Python Libraries: - Open your terminal or command prompt. - Type `pip install requests` and press Enter. 3. Write Python Script: - Create a new Python file (e.g., `save_chatgpt_to_notion.py`). - Paste the following code into the file, replacing `YOUR_NOTION_API_TOKEN` with your actual token: ```python import requests def save_chatgpt_response_to_notion(response, page_id, token): """Saves a ChatGPT response to a Notion page.""" url = f"https://api.notion.com/v1/pages/{page_id}/children" headers = {"Authorization": f"Bearer {token}"} data = { "parent": { "page_id": page_id }, "properties": { "title": { "title": [ { "text": { "content": "ChatGPT Response" } } ] }, "content": { "rich_text": [ { "text": { "content": response } } ] } } } response = requests.post(url, headers=headers, json=data) print(response.status_code) Example usage page_id = "YOUR_NOTION_PAGE_ID" token = "YOUR_NOTION_API_TOKEN" Get ChatGPT responses (replace with your actual ChatGPT interaction) chatgpt_responses = [ "This is the first ChatGPT response.", "This is the second ChatGPT response.", "This is the third ChatGPT response." ] Save each response to Notion for response in chatgpt_responses: save_chatgpt_response_to_notion(response, page_id, token) ``` 4. Run the Script: - In your terminal, navigate to the directory where you saved the Python file. - Type `python save_chatgpt_to_notion.py` and press Enter. 5. Check Notion: - Open your Notion workspace and go to the page specified by `page_id`. - You should see your ChatGPT responses saved as separate blocks.

Save ChatGPT Conversations to Notion with One Click Export your ChatGPT conversations directly to Notion with a single click.

290.25 M