Open-source RightAI Tools Directory
  • Discover AI
  • Submit
  • Startup
  • Blog
Open-source RightAI Tools Directory
Discover the best AI tools of 2025 with the RightAI Tools Directory!

Friend Links

AI Anime GeneratorToolsApp AI

Support

Tap4
Privacy policyTerms & ConditionsContact Us
Loading...
loading...

Effortless Image Splitting Tool for Creative Projects

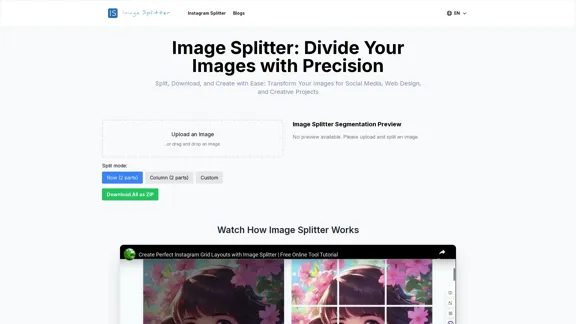
Easily split large images online into smaller parts for social media, web design, and creative projects with our intuitive Image Splitter tool.
Visit Website
Effortless Image Splitting Tool for Creative Projects
Visit Website

Introduction

Image Splitter is a free online tool designed to divide large images into multiple smaller parts with precision. It offers a user-friendly interface for splitting images according to user-specified rows and columns, or simply dividing them into halves. This versatile tool caters to various needs in social media, web design, printing, image processing, and creative projects.

Feature

  1. Multiple Splitting Modes

    • Row split (2 parts)
    • Column split (2 parts)
    • Custom split (user-defined rows and columns)
  2. Supported Image Formats

    • JPG, PNG, GIF, BMP, and other common formats
  3. Real-time Preview

    • Instant visualization of the splitting effect
  4. Download Options

    • Individual piece download
    • Batch download as ZIP file
  5. User-friendly Interface

    • Drag-and-drop or click-to-upload functionality
    • Responsive design for various devices
  6. No Registration Required

    • Immediate access without account creation
  7. Privacy Protection

    • Client-side processing without server storage
  8. Flexible Customization

    • Up to 20x20 grid split in custom mode

How to Use?

  1. For optimal performance, upload images smaller than 10MB.

  2. Use the custom split mode for more complex divisions, such as 3x3 or 4x4 grids.

  3. Hover over split images in the preview area to reveal individual download buttons.

  4. Utilize the "Download All as ZIP" feature for convenient batch downloading.

  5. For uneven splits, pre-edit your image before uploading to the Image Splitter.

  6. Experiment with different splitting modes to achieve the desired effect for your project.

  7. Remember that the tool maintains original image quality, but format conversions may have a slight impact.

FAQ

Is the Image Splitter free to use?

Yes, the Image Splitter tool is completely free to use with all features available at no charge.

Do I need to register or log in to use the Image Splitter?

No registration or login is required. You can directly access the webpage and start using the tool immediately.

Can I upload multiple images for splitting at once?

Currently, the tool processes one image at a time. However, you can quickly delete the current image and upload a new one for consecutive operations.

Are the split images saved on your servers?

No, all image processing is done in your browser. The tool doesn't store your images or split results on its servers.

Is there a size limit for uploaded images?

To ensure optimal tool performance, it's recommended to upload images no larger than 10MB. Larger images may affect processing speed or cause browser lag.

Evaluation

  1. The Image Splitter tool offers a straightforward and efficient solution for dividing images, catering to various needs across different industries and creative projects.

  2. Its user-friendly interface and responsive design make it accessible to users of all skill levels, from beginners to professionals.

  3. The tool's privacy-focused approach, processing images client-side without server storage, is a significant advantage in today's data-conscious environment.

  4. While the tool excels in its primary function, it could benefit from additional features such as adjustable split sizes or basic image editing capabilities.

  5. The limitation on file size (10MB recommendation) might be restrictive for users working with high-resolution images, suggesting room for optimization in handling larger files.

  6. Overall, the Image Splitter provides a valuable, free service that effectively meets the needs of most users in image splitting tasks, with potential for further enhancements to broaden its appeal and functionality.

Latest Traffic Insights

  • Monthly Visits

    7.29 K

  • Bounce Rate

    80.28%

  • Pages Per Visit

    1.29

  • Time on Site(s)

    39.08

  • Global Rank

    3238606

  • Country Rank

    China 96965

Recent Visits

Traffic Sources

  • Social Media:
    2.03%
  • Paid Referrals:
    0.49%
  • Email:
    0.13%
  • Referrals:
    37.09%
  • Search Engines:
    18.64%
  • Direct:
    41.61%
More Data

Related Websites

SellingPilot - Your AI-powered assistant for e-commerce.
View Detail

SellingPilot - Your AI-powered assistant for e-commerce.

SellingPilot - Your AI-powered assistant for e-commerce.

SellingPilot is your AI-powered assistant for e-commerce. It helps you streamline your operations and accelerate your e-commerce business.

290.25 M
Free Flux.1 | Flux | flux image generator | FLUX-1.net
View Detail

Free Flux.1 | Flux | flux image generator | FLUX-1.net

Free Flux.1 | Flux | flux image generator | FLUX-1.net

Free FLUX.1, online FLUX, FLUX ai image generator, FLUX-1.net

4.88 K
ilikeimg - AI-Powered Image Tools | Free Online Photo Editor
View Detail

ilikeimg - AI-Powered Image Tools | Free Online Photo Editor

ilikeimg - AI-Powered Image Tools | Free Online Photo Editor

Free online tools to convert, crop, compress, resize, and enhance your images. No registration required for basic features.

0
Course Decode
View Detail

Course Decode

Course Decode

Here is the translation into English: See which degrees are actually used by their graduates. Based on analysis of 349,996 LinkedIn profiles.

0
AI Product Shot - Create Beautiful Product Images with AI
View Detail

AI Product Shot - Create Beautiful Product Images with AI

AI Product Shot - Create Beautiful Product Images with AI

AI Product Shot - Create stunning and professional AI-generated product images that boost your sales. Achieve expert-level product photos using AI technology. Begin your journey for free.

2.41 K
Batch Save ChatGPT to Notion

This is a guide on how to save multiple ChatGPT responses to Notion in a batch. 

Tools You'll Need:

* ChatGPT: An AI chatbot that can generate text.
* Notion: A note-taking and project management tool.
* Python: A programming language.
* Requests Library: A Python library for making HTTP requests.

Steps:

1. Get Your Notion API Token:
   - Go to your Notion workspace settings.
   - Navigate to the "Integrations" tab.
   - Click "Create new integration" and choose "API Token".
   - Copy your API token.

2. Install Python Libraries:
   - Open your terminal or command prompt.
   - Type `pip install requests` and press Enter.

3. Write Python Script:
   - Create a new Python file (e.g., `save_chatgpt_to_notion.py`).
   - Paste the following code into the file, replacing `YOUR_NOTION_API_TOKEN` with your actual token:

```python
import requests

def save_chatgpt_response_to_notion(response, page_id, token):
  """Saves a ChatGPT response to a Notion page."""
  url = f"https://api.notion.com/v1/pages/{page_id}/children"
  headers = {"Authorization": f"Bearer {token}"}
  data = {
    "parent": {
      "page_id": page_id
    },
    "properties": {
      "title": {
        "title": [
          {
            "text": {
              "content": "ChatGPT Response"
            }
          }
        ]
      },
      "content": {
        "rich_text": [
          {
            "text": {
              "content": response
            }
          }
        ]
      }
    }
  }
  response = requests.post(url, headers=headers, json=data)
  print(response.status_code)

Example usage
page_id = "YOUR_NOTION_PAGE_ID"
token = "YOUR_NOTION_API_TOKEN"

Get ChatGPT responses (replace with your actual ChatGPT interaction)
chatgpt_responses = [
  "This is the first ChatGPT response.",
  "This is the second ChatGPT response.",
  "This is the third ChatGPT response."
]

Save each response to Notion
for response in chatgpt_responses:
  save_chatgpt_response_to_notion(response, page_id, token)
```

4. Run the Script:
   - In your terminal, navigate to the directory where you saved the Python file.
   - Type `python save_chatgpt_to_notion.py` and press Enter.

5. Check Notion:
   - Open your Notion workspace and go to the page specified by `page_id`.
   - You should see your ChatGPT responses saved as separate blocks.
View Detail

Batch Save ChatGPT to Notion This is a guide on how to save multiple ChatGPT responses to Notion in a batch. Tools You'll Need: * ChatGPT: An AI chatbot that can generate text. * Notion: A note-taking and project management tool. * Python: A programming language. * Requests Library: A Python library for making HTTP requests. Steps: 1. Get Your Notion API Token: - Go to your Notion workspace settings. - Navigate to the "Integrations" tab. - Click "Create new integration" and choose "API Token". - Copy your API token. 2. Install Python Libraries: - Open your terminal or command prompt. - Type `pip install requests` and press Enter. 3. Write Python Script: - Create a new Python file (e.g., `save_chatgpt_to_notion.py`). - Paste the following code into the file, replacing `YOUR_NOTION_API_TOKEN` with your actual token: ```python import requests def save_chatgpt_response_to_notion(response, page_id, token): """Saves a ChatGPT response to a Notion page.""" url = f"https://api.notion.com/v1/pages/{page_id}/children" headers = {"Authorization": f"Bearer {token}"} data = { "parent": { "page_id": page_id }, "properties": { "title": { "title": [ { "text": { "content": "ChatGPT Response" } } ] }, "content": { "rich_text": [ { "text": { "content": response } } ] } } } response = requests.post(url, headers=headers, json=data) print(response.status_code) Example usage page_id = "YOUR_NOTION_PAGE_ID" token = "YOUR_NOTION_API_TOKEN" Get ChatGPT responses (replace with your actual ChatGPT interaction) chatgpt_responses = [ "This is the first ChatGPT response.", "This is the second ChatGPT response.", "This is the third ChatGPT response." ] Save each response to Notion for response in chatgpt_responses: save_chatgpt_response_to_notion(response, page_id, token) ``` 4. Run the Script: - In your terminal, navigate to the directory where you saved the Python file. - Type `python save_chatgpt_to_notion.py` and press Enter. 5. Check Notion: - Open your Notion workspace and go to the page specified by `page_id`. - You should see your ChatGPT responses saved as separate blocks.

Batch Save ChatGPT to Notion This is a guide on how to save multiple ChatGPT responses to Notion in a batch. Tools You'll Need: * ChatGPT: An AI chatbot that can generate text. * Notion: A note-taking and project management tool. * Python: A programming language. * Requests Library: A Python library for making HTTP requests. Steps: 1. Get Your Notion API Token: - Go to your Notion workspace settings. - Navigate to the "Integrations" tab. - Click "Create new integration" and choose "API Token". - Copy your API token. 2. Install Python Libraries: - Open your terminal or command prompt. - Type `pip install requests` and press Enter. 3. Write Python Script: - Create a new Python file (e.g., `save_chatgpt_to_notion.py`). - Paste the following code into the file, replacing `YOUR_NOTION_API_TOKEN` with your actual token: ```python import requests def save_chatgpt_response_to_notion(response, page_id, token): """Saves a ChatGPT response to a Notion page.""" url = f"https://api.notion.com/v1/pages/{page_id}/children" headers = {"Authorization": f"Bearer {token}"} data = { "parent": { "page_id": page_id }, "properties": { "title": { "title": [ { "text": { "content": "ChatGPT Response" } } ] }, "content": { "rich_text": [ { "text": { "content": response } } ] } } } response = requests.post(url, headers=headers, json=data) print(response.status_code) Example usage page_id = "YOUR_NOTION_PAGE_ID" token = "YOUR_NOTION_API_TOKEN" Get ChatGPT responses (replace with your actual ChatGPT interaction) chatgpt_responses = [ "This is the first ChatGPT response.", "This is the second ChatGPT response.", "This is the third ChatGPT response." ] Save each response to Notion for response in chatgpt_responses: save_chatgpt_response_to_notion(response, page_id, token) ``` 4. Run the Script: - In your terminal, navigate to the directory where you saved the Python file. - Type `python save_chatgpt_to_notion.py` and press Enter. 5. Check Notion: - Open your Notion workspace and go to the page specified by `page_id`. - You should see your ChatGPT responses saved as separate blocks.

Save ChatGPT Conversations to Notion with One Click Export your ChatGPT conversations directly to Notion with a single click.

290.25 M
ChatGPT Toolbar Companion
View Detail

ChatGPT Toolbar Companion

ChatGPT Toolbar Companion

The Ultimate ChatGPT Toolbar Companion with Prompts, Text-to-Speech, Speech-to-Text, and Auto Continue.

290.25 M
LooksMaxx Report - AI powered apps to help you enhance your appearance and maximize your attractiveness
View Detail

LooksMaxx Report - AI powered apps to help you enhance your appearance and maximize your attractiveness

LooksMaxx Report - AI powered apps to help you enhance your appearance and maximize your attractiveness

Our AI-powered apps can analyze your body, face, and skin tone, ranging from attractiveness ratings to glow-up suggestions. These tools aim to help you enhance your appearance, refine your style, and increase your self-confidence. We offer straightforward, effective, and personalized AI solutions designed to assist you in becoming the best version of yourself.

2.81 K