Open-source RightAI Tools Directory
  • Discover AI
  • Submit
  • Startup
  • Blog
Open-source RightAI Tools Directory
Discover the best AI tools of 2025 with the RightAI Tools Directory!

Friend Links

AI Anime GeneratorToolsApp AI

Support

Tap4
Privacy policyTerms & ConditionsContact Us
Loading...
loading...

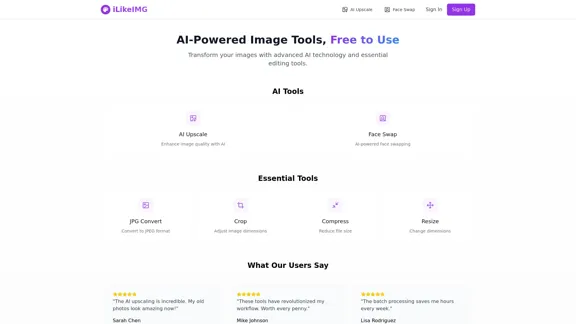
ilikeimg - AI-Powered Image Tools | Free Online Photo Editor

Free online tools to convert, crop, compress, resize, and enhance your images. No registration required for basic features.
Visit Website
ilikeimg - AI-Powered Image Tools | Free Online Photo Editor
Visit Website

Introduction

iLikeIMG offers AI-powered image tools that enhance and transform images using advanced technology. Users can access a variety of features, including image upscaling, face swapping, and essential editing tools, all designed to improve image quality and streamline workflows. The platform is free to use, with options for premium features.

Feature

  1. AI Upscale

    Enhance image quality with AI technology that adds detail and improves clarity while maintaining a natural appearance.

  2. Face Swap

    Utilize AI-powered face swapping to create fun and engaging images by seamlessly replacing faces in photos.

  3. Basic Tools

    Access essential editing tools such as JPG conversion, image compression, cropping, and resizing to meet various image editing needs.

  4. Batch Processing

    Save time with batch processing capabilities, allowing users to edit multiple images simultaneously.

  5. Daily Credits

    Users receive daily credits for processing images, which reset based on the selected plan.

  6. Data Security

    iLikeIMG employs enterprise-grade encryption and automatically deletes images after processing to ensure user data is secure.

How to Use?

  1. Sign up for an account to access premium features and daily credits.
  2. Explore the AI tools available, such as AI Upscale and Face Swap, to enhance your images.
  3. Use the batch processing feature to edit multiple images at once, saving time and effort.
  4. Familiarize yourself with the basic tools for quick edits, including cropping and resizing.
  5. Regularly check your daily credits to maximize the use of AI tools.

FAQ

What are credits?

Credits are used for processing images on the platform. They reset daily and vary based on your subscription plan.

How does AI upscaling work?

The AI technology analyzes images to add detail and enhance quality while preserving a natural look.

Can I cancel anytime?

Yes, users can cancel their premium subscription at any time and will retain access until the end of the billing period.

Is my data secure?

iLikeIMG uses enterprise-grade encryption and automatically deletes processed images to ensure data security.

What tools are available for free?

The free plan includes basic image tools and limited access to AI features, providing users with essential editing capabilities.

Price

PlanFeaturesPrice
FreeBasic image tools, 50 credits daily$0 Forever
PremiumAll basic tools, AI-powered features, 200 credits daily, priority processing$4.99/month
The price is for reference only, please refer to the latest official data for actual information.

Evaluation

  1. iLikeIMG effectively combines AI technology with essential image editing tools, making it accessible for users of all skill levels.
  2. The AI upscaling and face swap features are particularly impressive, providing high-quality results that enhance user images.
  3. While the free plan offers valuable tools, the limitations may prompt users to consider the premium subscription for more extensive features.
  4. The platform could improve by offering more advanced editing options and additional AI tools to cater to professional users.
  5. Overall, iLikeIMG is a user-friendly solution for image editing, but expanding its features could enhance its appeal to a broader audience.

Latest Traffic Insights

  • Monthly Visits

    0

  • Bounce Rate

    0.00%

  • Pages Per Visit

    0.00

  • Time on Site(s)

    0.00

  • Global Rank

    -

  • Country Rank

    -

Recent Visits

Traffic Sources

  • Social Media:
    0.00%
  • Paid Referrals:
    0.00%
  • Email:
    0.00%
  • Referrals:
    0.00%
  • Search Engines:
    0.00%
  • Direct:
    0.00%
More Data

Related Websites

Midjourney API - Automate Midjourney AI Image Generation 

This document outlines how to use the Midjourney API to automate the generation of AI images. 

What is the Midjourney API?

The Midjourney API allows developers to programmatically interact with the powerful Midjourney AI model. This means you can generate images, control various parameters, and integrate Midjourney into your own applications and workflows.

Why Use the Midjourney API?

* Automation: Automate the creation of images for various purposes, such as marketing materials, website content, or research projects.
* Customization: Fine-tune image generation by controlling parameters like aspect ratio, style, and seed values.
* Integration: Seamlessly integrate Midjourney's capabilities into your existing tools and platforms.

Getting Started

1. Sign Up for a Midjourney Account: You'll need a Midjourney account to access the API.

2. Obtain an API Key: Once you have an account, you can generate an API key from your account settings.

3. Choose a Programming Language: The Midjourney API supports various programming languages, including Python, JavaScript, and Go.

4. Install the API Client: Install the appropriate API client library for your chosen language.

5. Start Generating Images: Use the API client to send image generation requests to the Midjourney server.

Example (Python):

```python
import midjourney

Replace with your actual API key
api_key = "YOUR_API_KEY"

Create a Midjourney client
client = midjourney.Client(api_key=api_key)

Generate an image
response = client.create_image(prompt="A cat wearing a hat", num_images=1)

Print the image URL
print(response.images[0].url)
```

Documentation and Resources

For detailed information about the Midjourney API, including available endpoints, parameters, and examples, please refer to the official documentation: [https://docs.midjourney.com/](https://docs.midjourney.com/)
View Detail

Midjourney API - Automate Midjourney AI Image Generation This document outlines how to use the Midjourney API to automate the generation of AI images. What is the Midjourney API? The Midjourney API allows developers to programmatically interact with the powerful Midjourney AI model. This means you can generate images, control various parameters, and integrate Midjourney into your own applications and workflows. Why Use the Midjourney API? * Automation: Automate the creation of images for various purposes, such as marketing materials, website content, or research projects. * Customization: Fine-tune image generation by controlling parameters like aspect ratio, style, and seed values. * Integration: Seamlessly integrate Midjourney's capabilities into your existing tools and platforms. Getting Started 1. Sign Up for a Midjourney Account: You'll need a Midjourney account to access the API. 2. Obtain an API Key: Once you have an account, you can generate an API key from your account settings. 3. Choose a Programming Language: The Midjourney API supports various programming languages, including Python, JavaScript, and Go. 4. Install the API Client: Install the appropriate API client library for your chosen language. 5. Start Generating Images: Use the API client to send image generation requests to the Midjourney server. Example (Python): ```python import midjourney Replace with your actual API key api_key = "YOUR_API_KEY" Create a Midjourney client client = midjourney.Client(api_key=api_key) Generate an image response = client.create_image(prompt="A cat wearing a hat", num_images=1) Print the image URL print(response.images[0].url) ``` Documentation and Resources For detailed information about the Midjourney API, including available endpoints, parameters, and examples, please refer to the official documentation: [https://docs.midjourney.com/](https://docs.midjourney.com/)

Midjourney API - Automate Midjourney AI Image Generation This document outlines how to use the Midjourney API to automate the generation of AI images. What is the Midjourney API? The Midjourney API allows developers to programmatically interact with the powerful Midjourney AI model. This means you can generate images, control various parameters, and integrate Midjourney into your own applications and workflows. Why Use the Midjourney API? * Automation: Automate the creation of images for various purposes, such as marketing materials, website content, or research projects. * Customization: Fine-tune image generation by controlling parameters like aspect ratio, style, and seed values. * Integration: Seamlessly integrate Midjourney's capabilities into your existing tools and platforms. Getting Started 1. Sign Up for a Midjourney Account: You'll need a Midjourney account to access the API. 2. Obtain an API Key: Once you have an account, you can generate an API key from your account settings. 3. Choose a Programming Language: The Midjourney API supports various programming languages, including Python, JavaScript, and Go. 4. Install the API Client: Install the appropriate API client library for your chosen language. 5. Start Generating Images: Use the API client to send image generation requests to the Midjourney server. Example (Python): ```python import midjourney Replace with your actual API key api_key = "YOUR_API_KEY" Create a Midjourney client client = midjourney.Client(api_key=api_key) Generate an image response = client.create_image(prompt="A cat wearing a hat", num_images=1) Print the image URL print(response.images[0].url) ``` Documentation and Resources For detailed information about the Midjourney API, including available endpoints, parameters, and examples, please refer to the official documentation: [https://docs.midjourney.com/](https://docs.midjourney.com/)

Easily integrate Midjourney AI into your apps using the Midjourney API. Start creating AI images automatically today!

14.36 K
Batch Save ChatGPT to Notion

This is a guide on how to save multiple ChatGPT responses to Notion in a batch. 

Tools You'll Need:

* ChatGPT: An AI chatbot that can generate text.
* Notion: A note-taking and project management tool.
* Python: A programming language.
* Requests Library: A Python library for making HTTP requests.

Steps:

1. Get Your Notion API Token:
   - Go to your Notion workspace settings.
   - Navigate to the "Integrations" tab.
   - Click "Create new integration" and choose "API Token".
   - Copy your API token.

2. Install Python Libraries:
   - Open your terminal or command prompt.
   - Type `pip install requests` and press Enter.

3. Write Python Script:
   - Create a new Python file (e.g., `save_chatgpt_to_notion.py`).
   - Paste the following code into the file, replacing `YOUR_NOTION_API_TOKEN` with your actual token:

```python
import requests

def save_chatgpt_response_to_notion(response, page_id, token):
  """Saves a ChatGPT response to a Notion page."""
  url = f"https://api.notion.com/v1/pages/{page_id}/children"
  headers = {"Authorization": f"Bearer {token}"}
  data = {
    "parent": {
      "page_id": page_id
    },
    "properties": {
      "title": {
        "title": [
          {
            "text": {
              "content": "ChatGPT Response"
            }
          }
        ]
      },
      "content": {
        "rich_text": [
          {
            "text": {
              "content": response
            }
          }
        ]
      }
    }
  }
  response = requests.post(url, headers=headers, json=data)
  print(response.status_code)

Example usage
page_id = "YOUR_NOTION_PAGE_ID"
token = "YOUR_NOTION_API_TOKEN"

Get ChatGPT responses (replace with your actual ChatGPT interaction)
chatgpt_responses = [
  "This is the first ChatGPT response.",
  "This is the second ChatGPT response.",
  "This is the third ChatGPT response."
]

Save each response to Notion
for response in chatgpt_responses:
  save_chatgpt_response_to_notion(response, page_id, token)
```

4. Run the Script:
   - In your terminal, navigate to the directory where you saved the Python file.
   - Type `python save_chatgpt_to_notion.py` and press Enter.

5. Check Notion:
   - Open your Notion workspace and go to the page specified by `page_id`.
   - You should see your ChatGPT responses saved as separate blocks.
View Detail

Batch Save ChatGPT to Notion This is a guide on how to save multiple ChatGPT responses to Notion in a batch. Tools You'll Need: * ChatGPT: An AI chatbot that can generate text. * Notion: A note-taking and project management tool. * Python: A programming language. * Requests Library: A Python library for making HTTP requests. Steps: 1. Get Your Notion API Token: - Go to your Notion workspace settings. - Navigate to the "Integrations" tab. - Click "Create new integration" and choose "API Token". - Copy your API token. 2. Install Python Libraries: - Open your terminal or command prompt. - Type `pip install requests` and press Enter. 3. Write Python Script: - Create a new Python file (e.g., `save_chatgpt_to_notion.py`). - Paste the following code into the file, replacing `YOUR_NOTION_API_TOKEN` with your actual token: ```python import requests def save_chatgpt_response_to_notion(response, page_id, token): """Saves a ChatGPT response to a Notion page.""" url = f"https://api.notion.com/v1/pages/{page_id}/children" headers = {"Authorization": f"Bearer {token}"} data = { "parent": { "page_id": page_id }, "properties": { "title": { "title": [ { "text": { "content": "ChatGPT Response" } } ] }, "content": { "rich_text": [ { "text": { "content": response } } ] } } } response = requests.post(url, headers=headers, json=data) print(response.status_code) Example usage page_id = "YOUR_NOTION_PAGE_ID" token = "YOUR_NOTION_API_TOKEN" Get ChatGPT responses (replace with your actual ChatGPT interaction) chatgpt_responses = [ "This is the first ChatGPT response.", "This is the second ChatGPT response.", "This is the third ChatGPT response." ] Save each response to Notion for response in chatgpt_responses: save_chatgpt_response_to_notion(response, page_id, token) ``` 4. Run the Script: - In your terminal, navigate to the directory where you saved the Python file. - Type `python save_chatgpt_to_notion.py` and press Enter. 5. Check Notion: - Open your Notion workspace and go to the page specified by `page_id`. - You should see your ChatGPT responses saved as separate blocks.

Batch Save ChatGPT to Notion This is a guide on how to save multiple ChatGPT responses to Notion in a batch. Tools You'll Need: * ChatGPT: An AI chatbot that can generate text. * Notion: A note-taking and project management tool. * Python: A programming language. * Requests Library: A Python library for making HTTP requests. Steps: 1. Get Your Notion API Token: - Go to your Notion workspace settings. - Navigate to the "Integrations" tab. - Click "Create new integration" and choose "API Token". - Copy your API token. 2. Install Python Libraries: - Open your terminal or command prompt. - Type `pip install requests` and press Enter. 3. Write Python Script: - Create a new Python file (e.g., `save_chatgpt_to_notion.py`). - Paste the following code into the file, replacing `YOUR_NOTION_API_TOKEN` with your actual token: ```python import requests def save_chatgpt_response_to_notion(response, page_id, token): """Saves a ChatGPT response to a Notion page.""" url = f"https://api.notion.com/v1/pages/{page_id}/children" headers = {"Authorization": f"Bearer {token}"} data = { "parent": { "page_id": page_id }, "properties": { "title": { "title": [ { "text": { "content": "ChatGPT Response" } } ] }, "content": { "rich_text": [ { "text": { "content": response } } ] } } } response = requests.post(url, headers=headers, json=data) print(response.status_code) Example usage page_id = "YOUR_NOTION_PAGE_ID" token = "YOUR_NOTION_API_TOKEN" Get ChatGPT responses (replace with your actual ChatGPT interaction) chatgpt_responses = [ "This is the first ChatGPT response.", "This is the second ChatGPT response.", "This is the third ChatGPT response." ] Save each response to Notion for response in chatgpt_responses: save_chatgpt_response_to_notion(response, page_id, token) ``` 4. Run the Script: - In your terminal, navigate to the directory where you saved the Python file. - Type `python save_chatgpt_to_notion.py` and press Enter. 5. Check Notion: - Open your Notion workspace and go to the page specified by `page_id`. - You should see your ChatGPT responses saved as separate blocks.

Save ChatGPT Conversations to Notion with One Click Export your ChatGPT conversations directly to Notion with a single click.

290.25 M
Picture To Summary AI - Get summary from image or picture by AI
View Detail

Picture To Summary AI - Get summary from image or picture by AI

Picture To Summary AI - Get summary from image or picture by AI

Picture To Summary AI is a tool for generating summaries from images or pictures.

2.15 K
Launch Your App in Days, Not Weeks | ShipAppFast
View Detail

Launch Your App in Days, Not Weeks | ShipAppFast

Launch Your App in Days, Not Weeks | ShipAppFast

The Swift boilerplate with all the necessary elements to bring your product to customers. From concept to production in just 5 minutes.

1.31 K
GPT-trainer - AI Chatbot over Your Own Data
View Detail

GPT-trainer - AI Chatbot over Your Own Data

GPT-trainer - AI Chatbot over Your Own Data

Create your own AI helper that gives you the information you need, whenever you need it. You don't need to know how to code!

290.25 M
ChatGPT-Powered Google Search
View Detail

ChatGPT-Powered Google Search

ChatGPT-Powered Google Search

Improve your Google searches with ChatGPT. Receive AI-powered insights along with your search results.

290.25 M
Grab 'n Tag
View Detail

Grab 'n Tag

Grab 'n Tag

Download a group of images at once and give each one a name based on what's in the picture.

290.25 M
4o Image API: Affordable, Stable, and Versatile AI Image Generation
View Detail

4o Image API: Affordable, Stable, and Versatile AI Image Generation

4o Image API: Affordable, Stable, and Versatile AI Image Generation

4oimageapi.io’s 4o Image API provides affordable, stable, and accurate AI image generation, allowing creators to easily produce high-quality visuals. With features such as text-to-image and image-to-image transformations, along with a variety of artistic styles, it offers dependable and effective tools for creative projects.

--